Summary
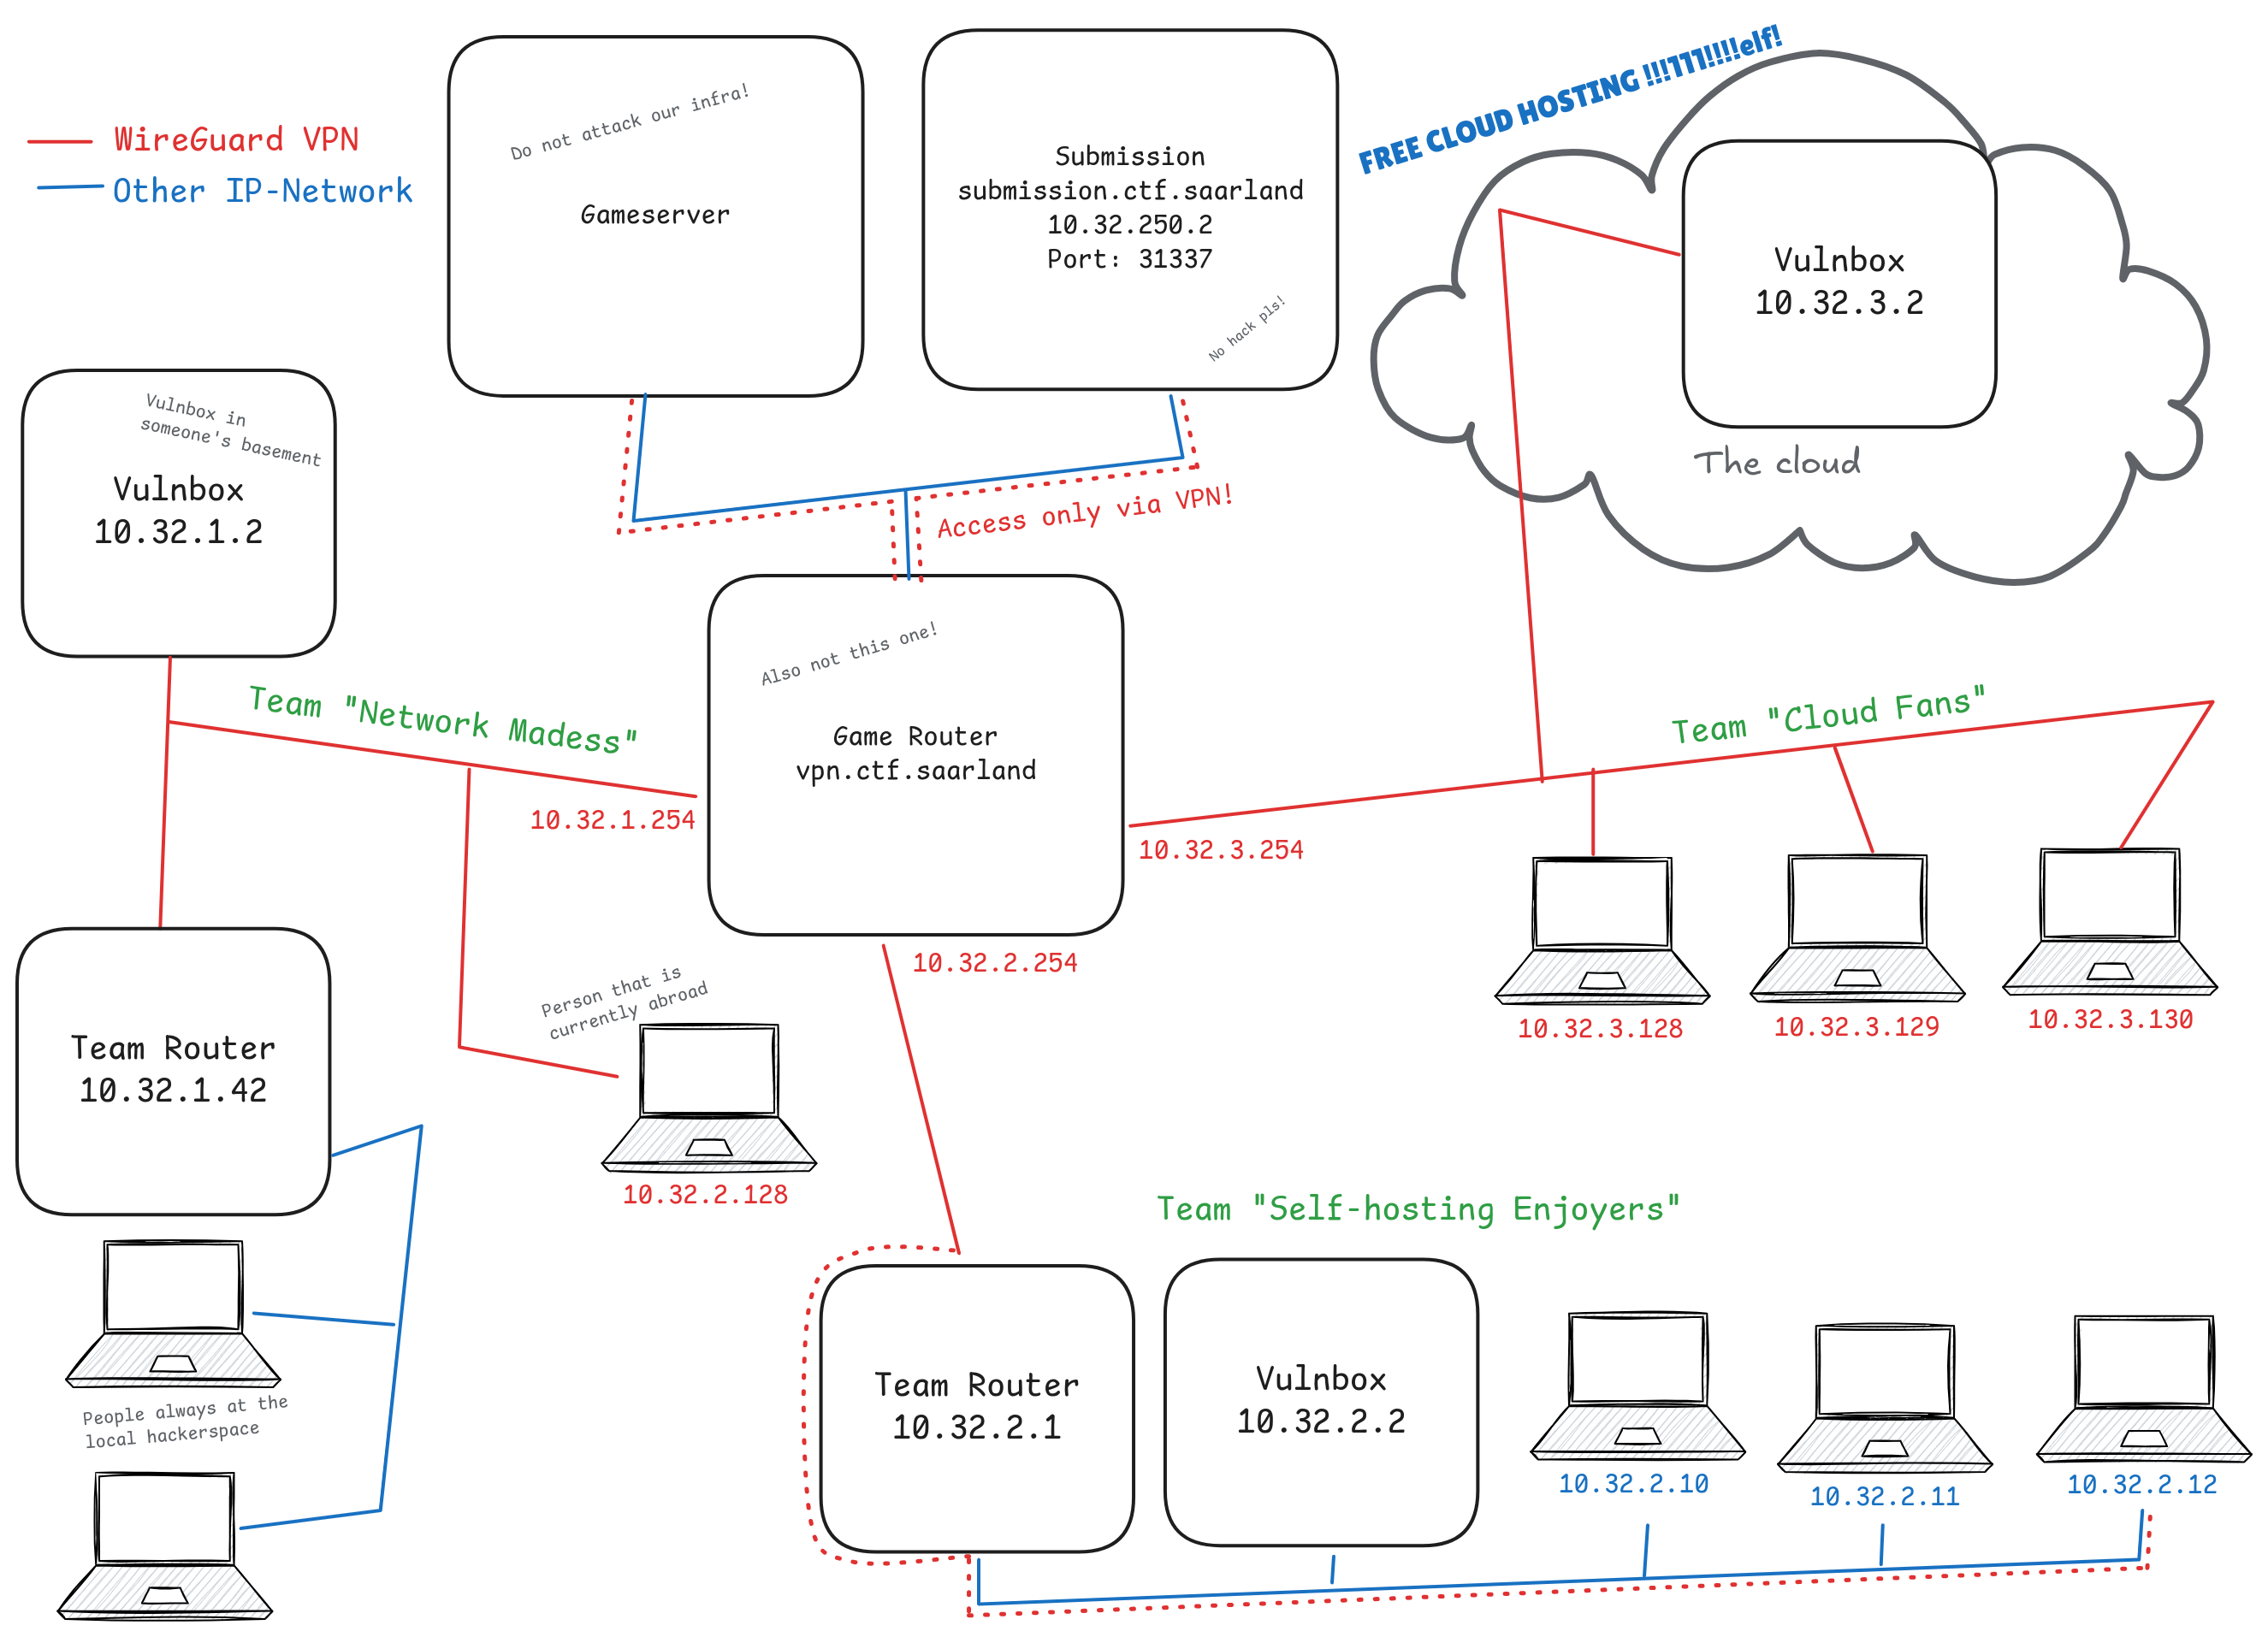
- Game network
10.32.0.0/15(10.32.0.0 - 10.33.255.255)- Team Network
-
10.(32+X).Y.0/24where
X := <team_id> // 200and
Y := <team_id> % 200
- Vulnbox IP
-
10.(32+X).Y.2 - Game Router IP
-
10.(32+X).Y.254(all anonymized game traffic will come from this address) - Team Router IP (selfhosting only)
-
10.(32+X).Y.1 - Testbox IP (selfhosting only)
-
10.(32+X).Y.3
A few words about WireGuard
In this year's iteration of saarCTF, all machines are connected to the game network using WireGuard. We have updated the instructions and put a lot of work into this webpage so participation is easy even without much prerequisite knowledge. If you are making use of a cloud-hosted vulnbox, you will find that getting connected is an absolute breeze. There are however, a few very fundamental aspects of WireGuard and our setup that everyone should be aware of:-
Public key crypto: Like you probably know from using SSH, WireGuard works with key
pairs. You generate then and only give us the public keys. Your private keys stay private.
To generate a key pair, run:
This results in two plain-text files with your private and public keys respectively.
wg genkey | tee private.key | wg pubkey | tee public.key - One key-pair - One connection: You can not simultaneously connect from multiple machines using the same key-pair. If you want to connect multiple machines, you need to create multiple key-pairs and enter the public keys on this webpage.
- Captains, Technicians and Players: If you signed up your team, you are the Captain. You can let your teammates register by giving them the magic join link. They can then upload public keys for their devices. These will automatically be assigned IPs in your team network, unless you explicitly turn that off. Captains can always manually edit all keys and ip-assignments in the team. They can also delegate this by promoting players to technicians. Players can only add new keys, edit their own and download configuration files.
-
wg-quick and configuration files: The canonical way of starting a WireGuard connection
is setting up a configuration file and running
sudo wg-quick up ./path/to/file.conf. After your keys were assigned an ip-address by auto-assignment or one of your team's technicians, you can download a configuration file. It's plain-text. You must insert your private key in the indicated spot before applying it. -
Disconnecting: wg-quick will create a network interface named equally to the config
file -
saarctfby default. To disconnect, simply delete the interface:sudo ip link del saarctf. -
Checking connection status: Simply run:
sudo wg - No automatic reconfiguration of clients: Key-pairs are assigned to ip-addresses, if a captain or technician changes the configuration, you also need to adjust the configration on the client - manually or by downloading the config file again.
-
Troubling ISPs: It seems that there are occasional misconfigurations from ISPs
causing very elusive problems with WireGuard connections, especially common with DSL
Internet connections. A typical manifestation is: HTTP works but SSH doesn't, or the
connection over the VPN is simply slow. These problems can usually be resolved by adding
MTU=1300to the[Interface]section of your config file and re-connecting. It might also be necessary to set the mtu even lower.
Cloud-hosted Setup
We offer to host a vulnbox in the cloud for you. When the game starts, you will be able to access your VM using SSH.
Players connect to the game network using WireGuard - each player needs to install WireGuard on his machine and their public keys must be entered on this website.
All players must have WireGuard installed, we provide everything else.
Captains:- The default network settings should be good (cloud hosting enabled, your interface has "Automatically assign free IPs to new keys/players" enabled).
- Store one or more public SSH keys on your team page. They will be deployed to your vulnbox later.
- When the game starts, go to your team page to create yourself a cloud-hosted VM. You then see its IP, you can use your private SSH keys to connect. It should be available a few minutes later.
- Use the Join Link from your captain to register yourself
-
Create your personal WireGuard keypair:
wg genkey | tee secret.key | wg pubkey | tee public.key - On the "Me & My Team"-page, insert your public key in your keyslot and save
- After a few seconds your personal WireGuard config should be available for download (hover the key to see the download button)
- Edit the downloaded file with a text editor and insert your secret key
- Use the file to connect to the WireGuard VPN:
sudo wg-quick up ./path-to-config.conf -
Check if you can
ping 10.32.250.2andnc submission.ctf.saarland 31337- if so then the VPN connection works.
- Each player needs its own configuration file, it is not possible to use the same configuration one more than one machine.
- Your captain can add as many keys and generate as many config files as necessary, even for larger subnets.
- You can change your SSH public keys at any time, changes will synchronize to your vulnbox within a few minutes.
- Don't try to upload too many SSH keys ;)
Self-hosted Setup: Vulnbox, VPN and Network
As usual, you can host the vulnbox yourself. The Vulnbox will be delivered as encrypted VirtualBox image in OVA format. You need at least VirtualBox 5.2, newer is better. We suggest your host machine has at least 4 CPU cores and 6 GB RAM, more is better. We will provide a router image for your convenience and a test machine before the competition.
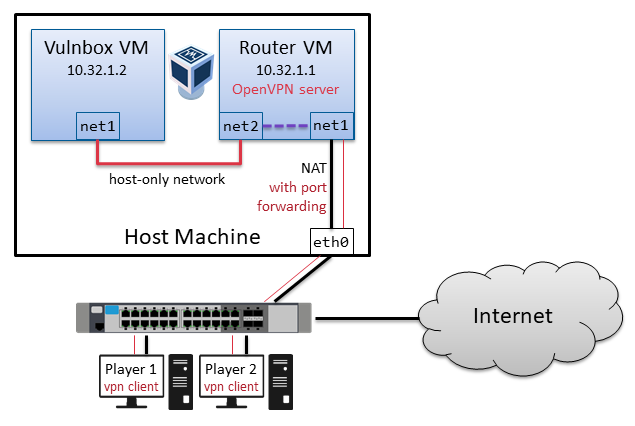
You need one machine to host the Vulnbox and act as VPN gateway (between your team network and our game network). Depending on your infrastructure there are different setups possible. We suggest our pre-configured Router VM image to save you most of the configuration.
- If you have a machine with two network interfaces (preferably physical), we suggest setup 2 (Router VM + physical team network).
- If you do not have a machine with two network interfaces, use setup 3 (Router VM + team-internal VPN).
- If you know what you're doing, use setup 4 (manual setup).
You can see if your configuration works on vpn.ctf.saarland.
To test the other direction ping submission.ctf.saarland.
eth0
in this example) and connect your team-mates to your second interface using switches
(eth1), not routers. No configuration is necessary for your team-mates.
Follow these instructions to setup VPN and VMs.

-
Generate a WireGuard keypair for your selfhosted setup:
wg genkey | tee secret.key | wg pubkey | tee public.key - On your team page, switch to self-hosted hosting.
- On your team page, add your new public key and save
-
In the interface configuration below, edit the peer for your new key (or create a new one if necessary).
We suggest to give it
AllowedIPs=10.X.Y.1/25. Save your changes. - Download the VPN config file for your key (hover the key to see the download button).
- Download and install Virtualbox, download all VM images.
- Import the Router VM and the Testbox VM to Virtualbox.
- Check the router's network adapter configuration:
- Adapter 1 should be NAT.
- Adapter 2 should be bridged to your secondary interface eth1.
- Once network adapters are properly configured, start the Router VM (not yet the Testbox).
- Connect to the Router VM:
- Either use the displayed console
- Or use SSH (exposed on port 22222 on your host):
ssh -p 22222 root@localhost. Password is123456789.
- Follow the setup assistant. Answer the DHCP question with yes. Answer the VPN question with yes if you want to connect remote players to a VPN server running on your router. Note that you can also let them connect directly to the game router by assigning them on of the remaining IPs in our web interface.
- Copy your public SSH keys to
/var/www/html/saarctf/authorized_keys. These keys will be automatically deployed to the Testbox and Vulnbox later. - Copy the VPN configuration you downloaded to
/etc/wireguard/saarctf.conf. Start the VPN withsystemctl start wg-quick@saarctf. Enable permanently withsystemctl enable wg-quick@saarctf. - Check if you can ping
10.32.250.2from the Router. If so then your VPN connection works. - Check the Testbox network adapter configuration: Adapter 1 should be bridged to your secondary interface eth1.
- Start the Testbox. If you added SSH keys to the router (step 7) and enabled DHCP (step 6) it should configure automatically. If not connect using display or serial console and follow the setup assistant.
- Login on the Testbox (use its network IP and your SSH key) and try to ping
10.32.250.2. If ping succeeds then your setup works.
- If you play on-site, you can just plug your machine into the switch and be done.
- If you play remote, ask your captain. They might have an OpenVPN or Wireguard config for you.
- If not, use the Join Link from your captain to register yourself on our webpage
-
Create your personal WireGuard keypair:
wg genkey | tee secret.key | wg pubkey | tee public.key - On your team page, insert your public key in your keyslot and save
- Download your personal WireGuard config (hover the key to see the download button)
- Edit the downloaded file and insert your secret key
- Use the file to connect to the WireGuard VPN
-
Check if you can
ping 10.32.250.2andnc submission.ctf.saarland 31337- if so then the VPN connection works.
- To setup the Vulnbox decrypt it (
7z x <file>.7z), then follow the instructions for the Testbox. - Internet access for the Vulnbox and Testbox is disabled by default.
To enable run
./internet-access-vm-enable.shon the router. - If you have remote players, they can connect via our Wireguard VPN (see instructions above). If you want to host your own VPN:
- Answer the VPN question with yes (while setting up the router VM). Your VM will expose port 1194 UDP on your host.
- Make this port accessible to your remote players.
- Copy
/root/team-vpn-client.conffrom the router, insert your public IP in the first line and distribute to your remote players. - Your remote players should setup OpenVPN to connect into the game network.
- If your host is headless check out vboxmanage or phpVirtualbox. This script might also be useful.
- If your experience connectivity problems after setting up the Router:
Sometimes it happens that the DHCP server on the Router VM pushes an invalid
default route to your host. You can see your routes using
ip route. If you see a default route via the Router VM just delete it:sudo ip route del default via 10.32.X.1
-
Generate a WireGuard keypair for your selfhosted setup:
wg genkey | tee secret.key | wg pubkey | tee public.key - On your team page, switch to self-hosted hosting.
- On your team page, add your new public key and save
-
In the interface configuration below, edit the peer of your new key (or create one if necessary).
We suggest to give it
AllowedIPs=10.X.Y.1/25. Save your changes. - Download the VPN config file for your key (hover the key to see the download button).
- Download and install Virtualbox, download all VM images.
-
In Virtualbox create a new host-only network for half of your team network:
10.X.Y.0/25, netmask255.255.255.128, no DHCP.
As of Virtualbox 6.1.28, you must explicitly allow the network range: add a line* 10.0.0.0/8 192.168.56.0/21to/etc/vbox/networks.conf. If that file does not exist, create it. - Import the Router VM and the Testbox VM to Virtualbox.
- Check the router's network adapter configuration:
- Adapter 1 should be NAT.
- Adapter 2 should be switched to host-only and connected to your new network from step 3.
- Connect to the Router VM:
- Either use the displayed console
- Or use SSH (exposed on port 22222 on your host):
ssh -p 22222 root@localhost. Password is123456789.
- Follow the setup assistant. Answer the DHCP question with yes. Answer the VPN questions with yes iff you do not want to use our WireGuard VPN for your players.
- Copy your public SSH keys to
/var/www/html/saarctf/authorized_keys. These keys will be automatically deployed to the Testbox and Vulnbox later. - Copy the game VPN configuration you generated to
/etc/wireguard/saarctf.conf. Start the VPN withsystemctl start wg-quick@saarctf. Enable permanently withsystemctl enable wg-quick@saarctf. - Check if you can ping
10.32.250.2from the Router. If so then your VPN connection works. - Check the Testbox network adapter configuration: Adapter 1 should be host-only in the same network as the Router.
- Start the Testbox. If you added SSH keys to the router (step 7) and enabled DHCP (step 6) it should configure automatically. If not connect using display or serial console and follow the setup assistant.
- Login on the Testbox (use its network IP and your SSH key) and try to ping
10.32.250.2. If ping succeeds then your setup works. - If you want to use our VPN: Distribute the join link from the team page to your players
- If you provide your own VPN: Copy
/root/team-vpn-client.conf(for OpenVPN) orteam-wireguard-client-*.conf(for Wireguard) from the router, insert your host's local network IP in the respective line and distribute to your team-mates. - Depending on your choice during setup, your team-mates should use OpenVPN or Wireguard
to connect into the game network via your host machine.
If they can ping
10.32.250.2and the Testbox everything should be fine.
- If your captain created their own VPN, they might have an OpenVPN or Wireguard config for you.
- If not, use the Join Link from your captain to register yourself on our webpage
-
Create your personal WireGuard keypair:
wg genkey | tee secret.key | wg pubkey | tee public.key - On your team page, insert your public key in your keyslot and save
- Download your personal WireGuard config (hover the key to see the download button)
- Edit the downloaded file and insert your secret key
- Use the file to connect to the WireGuard VPN
-
Check if you can
ping 10.32.250.2andnc submission.ctf.saarland 31337- if so then the VPN connection works.
- To setup the Vulnbox decrypt it (
7z x <file>.7z), then follow the instructions for the Testbox. - Internet access for the Vulnbox and Testbox is disabled by default.
To enable run
./internet-access-vm-enable.shon the router. - If your host is headless check out vboxmanage or phpVirtualbox. This script might also be useful.
- If your experience connectivity problems after setting up the Router:
Sometimes it happens that the DHCP server on the Router VM pushes an invalid
default route to your host. You can see your routes using
ip route. If you see a default route via the Router VM just delete it:sudo ip route del default via 10.32.X.1
You're on your own.
Generate a WireGuard keypair, add it to your team interface, and ensure it can route (at least) the vulnbox IP.
Use WireGuard with the generated configuration to connect your machine to the game network.
You can freely use your team network range, except .254, which is the game router. Just ensure
the Vulnbox gets the correct IP.
We know that it's sometimes hard to set up a Vulnbox on a system without monitor attached.
To easily setup the Vulnbox, you can use two shortcuts:
First use DHCP to assign the Vulnbox any IP from your team range (it will reconfigure to
10.X.Y.2 automatically).
Second have a webserver running on whatever machine is 10.X.Y.1 in your team range, which
serves a text file /saarctf/authorized_keys. If the Vulnbox can access this URL after
initial setup, it will enable SSH and install these keys.
Use the Testbox to test both steps.
Ask your captain how he wants you to connect to the game. Most likely, you can use the join link and generate your own WireGuard config (see the cloud-hosted setup for explanations).
You can play the game with two machines rented in the cloud. This is especially handy for teams that play together over internet. The following instructions assume you use Hetzner Cloud (where we also host our infrastructure), but in theory other cloud providers might also work out. Costs should be less than 1€ depending on your configuration. The following instructions assume that you already have an activated Hetzner Cloud Account.
-
Hosting the router
The router is the central machine for your team. It connects to Vulnbox and game VPN and hosts its own VPN server for your players.
-
In Hetzner Cloud Console, create a new "network" with IP range
10.32.0.0/11. Remove its default subnet and create a new one for your team network (for example10.32.99.0/25for team #99). - Create a new server "Router": select location Falkenstein, image "Debian 12", type "CX22", your network from step 1 and your SSH key.
- In Hetzner network settings, create a route for your network:
0.0.0.0/0, gateway is your router server. - SSH to the router server and install all software with our script:
wget 'https://ctf.saarland/static/scripts/install_cloud_router.sh' chmod +x install_cloud_router.sh ./install_cloud_router.sh - Fix routes to cloud machines (replace
32.99with your team network):ip route add 10.32.99.2/31 via 10.32.0.1 dev ens10 - On your team page, switch to selfhosted setup.
- Generate a new WireGuard keypair. Add the key on your team page, create a peer for it with IP `10.32.99.1/25`.
- Download the VPN configuration file (hover the WireGuard key), copy it to
/etc/wireguard/saarctf.conf. Start the VPN withsystemctl start wg-quick@saarctf. Enable permanently withsystemctl enable wg-quick@saarctf. - If your team wants to use OpenVPN: open
/root/team-vpn-client.conf, insert your server's public IP in the first line and distribute to your team. All players can use the same configuration file. - If your team does not want to use OpenVPN: tell them to follow the player instructions for the cloud-hosted setup. They'll connect to the game via our WireGuard VPN.
- Check if the router and the players can ping
10.32.250.2.
-
In Hetzner Cloud Console, create a new "network" with IP range
-
Hosting the testbox
While the testbox is not strictly necessary, you can already try out the setup process you'll need for the vulnbox later.
- Create a new server "Testbox": select location Falkenstein, image "Debian 12", type "CX22" and your SSH key. No network!
- Attach the new server to your network in the network configurations, manually assign IP
10.X.Y.3. - Reboot the server into rescue mode ("enable rescue & power cycle, system "linux64")
- Download testbox archive and install script:
cd /dev/shm wget 'https://ctf.saarland/static/scripts/install_cloud_bundle.sh' wget 'https://ctf.saarland/static/vm/2025/testbox.tar.xz' chmod +x install_cloud_bundle.sh - Install the bundle:
./install_cloud_bundle.sh saarctf-testbox.tar.xz - Edit
/mnt/root/.ssh/authorized_keysand insert your SSH key again - Reboot
-
Hosting the vulnbox
Hosting the vulnbox is similar to the testbox, only IP, download URL and password differ. The password will be released when the game starts.
- Create a new server "Vulnbox": select location Falkenstein, image "Debian 12", type "CX32" or "CX42" and your SSH key. No network!
- Attach the new server to your network in the network configurations, manually assign IP
10.X.Y.2. - Reboot the server into rescue mode ("enable rescue & power cycle, system "linux64")
- Download vulnbox archive and install script once it is released:
cd /dev/shm wget 'https://ctf.saarland/static/scripts/install_cloud_bundle.sh' wget 'https://ctf.saarland/static/vm/2025/vulnbox.tar.xz.gpg' chmod +x install_cloud_bundle.sh - Install the bundle:
./install_cloud_bundle.sh saarctf-vulnbox.tar.xz.gpg <PASSWORD> - Edit
/mnt/root/.ssh/authorized_keysand insert your SSH key again - Reboot
Hints:
- Hetzner Cloud charges you for offline servers. After the game you must delete all machines.
- We advertise against using AWS: traffic is expensive there, we can't estimate your final costs
- To get better performance, you could run your exploits on the Router machine
- If team VPN performance is too bad, you can create multiple VPN servers on the router: Clone the configs and change the server port.
Service status
Every tick the Gameserver connects to your services and rates them in one of these categories:
- UP — Service is working, you receive SLA points
- Flag missing — Service is working, but flags from last tick could not be retrieved. No SLA points.
- Mumble — Service is accessible but non-functional.
- Offline — Service can't be accessed, error on network layer.
- Not checked — If your VPN connection is terminated, your service will not be checked.
If your service is broken, you can see more details in the scoreboard.
Flag submission
You can submit flags in a plain TCP connection to submission.ctf.saarland port 31337 from your
team network (from VPN only).
Each flag must be submitted in a single line terminated by a line feed (\n).
For each submitted line, the submission server answers with one line that starts either with
[OK] if the flag was accepted, [ERR] if the flag is permanently
invalid or [OFFLINE] if submission is currently disabled. This status is possibly
followed by a more detailed description.
A non-complete list of possible responses:
[OK][ERR] Invalid format[ERR] Invalid flag[ERR] Expired[ERR] Already submitted[ERR] Can't submit flag from NOP team[ERR] This is your own flag[OFFLINE] CTF not running
Status endpoints
The endpoint https://scoreboard.ctf.saarland/attack.json gives you a JSON with all
information you need during the competition. It is updated at the beginning of each tick. Format:
{
    "teams": [
        {
            "id": 1,
            "name": "NOP",
            "ip": "10.32.1.2"
        },
        {
            "id": 2,
            "name": "saarsec",
            "ip": "10.32.2.2"
        }
    ],
    "flag_ids": {
        "service_1": {
            "10.32.1.2": {
                "15": ["username1", "username1.2"],
                "16": ["username2", "username2.2"]
            },
            "10.32.2.2": {
                "15": ["username3", "username3.2"],
                "16": ["username4", "username4.2"]
            }
        }
    }
}
"teams" contains a list of all teams that are online, including the IP of their
Vulnbox. If you limit your attacks to these IPs you can safe yourself some bandwidth.
Some services have "flag_ids", additional information that you might need for an
exploit. Usually this is the username of the Gameserver's account that you should attack.
The flag ids are only given for flags that are still valid.